I’ve been playing with Tunisian crochet stitches for a while now but never made anything with them. I found that this is a really fascinating technique, and there are infinite ways where you could put a stitch, the possibilities are endless. When I visited my parents last time I found some old pattern cuttings with black and white photos, the quality of the pictures are not brilliant and there’s no information about the stitches. But I was intrigued by this stitch...
After a dozen or so false starts, I think I finally got it sussed. When we start learning to knit or crochet, the first thing we make is most likely to be a scarf, so I’ll start by making a scarf. As one of my New Year’s resolutions is to make something in Tunisian crochet in 2011, I’m going to call it Tunisian Resolution Scarf.
Normally I like to crochet from charts, but I don’t know how to make Tunisian crochet charts. And because I’m not sure I’ll be clear with my instructions, I thought I’d use photo guides to help me. You will find the photo guides after the instructions.
The pattern is based on a 4-stitch repeats + 1. Mine has five pattern repeats, because I don't like wide scarves. To make the scarf wider or narrower you simply add or take away 4 stitches. Also you need 1 extra stitch on each end for the edges. To calculate how many stitches you need use this formula: #repeats x 4 + 1 + 2. Mine has 5 repeats so I started with 23 stitches.
On the return row, you will be asked to pull through 4 loops together and this effectively decreases 2 stitches, to compensate you will be making an increase on either side of this action. Hopefully this will make sense once you have read through the instructions and seen the photos, so please bear with me for now :-)
What you will need:
For my scarf, I used a DK weight yarn from my stash, it’s the leftover from my Not So Short Jacket. I used a 6mm Tunisian crochet hook to get a better drape. My scarf used 2 skeins about 320 meters. Of course you can use any weight yarn and hook, but I would recommend thicker yarn and large hooks for ease of manipulation and speed. :-)
If you are not familiar with Tunisian crochet there are tons of information available online. I like ChezCrochet which is a treasure trove on this technique, if you are after video tutorials you can check out CrochetKim on Youtube.
Some terminologies used in this pattern: (some are made up by myself)
- ch : chain
- lp: loop
- st: stitch
- tss: Tunisian simple stitch
- tfs: Tunisian full stitch (or plain stitch)
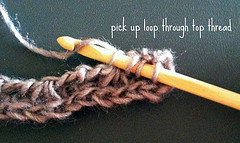
- ttt: this means “pick up loop through top thread”, I don’t know what this stitch is called, it’s like pick up loop through the back bump on a chain, but here it’s through the top thread between two vertical bars - please see photos below, it may make better sense.
- yo: yarn over
- yop: yarn over and pull through loop
- p2tog: pull through 2 loops together
- p4tog: pull through 4 loops together
- FR: forward row
- RR: return row (yo, *yo & p2tog* repeat between * * till end, 1 loop remain)
Instructions:
Foundation row: Ch 22 23, pick up lp in 2nd ch from hook through the back bump, and in each of the back bumps across; 23 loops. (I picked up loops in alternate directions, i.e. inserting the hook from front to back, then from back to front in the next bump, so the edge doesn’t curl so much.)
Foundation RR: work as normal back to the right, 1 lp remain.
Set up FR: *tss in the next st, tfs, ttt, tfs*, repeat * * across to the left until 2 st left, tss in the next st, pick up lp through both lps on the end of left edge. 5 repeats, 23 lps.
Set up RR: yop, * yo and p2tog, yop, yo and p4tog, yop *, repeat * *across back to the right until 2 st left, yo and p2tog twice. 5 repeats, 1 lp remain.
FR: *tss in the next st, tfs through the gap, ttt on top of the p4tog, tfs through the gap*, repeat * *across to the left until 2 st left, tss in the next st, pick up lp through both lps on the end of left edge. 5 repeats, 23 lps.
RR: same as Set up RR.
Repeat the FR and RR until you have the length you want, or you run out of yarn or got bored. Oh, in case you need to join in a new skein as I needed to, I joined at the end of a return row where there were only 2 loops left, then p2tog with the new yarn, leaving a 4 inch tail. Then I did a half square knot and wove in the ends separately. I found that the backside of this stitch pattern is perfect for weaving in ends. A bonus! :-)
End row: just do a FR across to the left (23 lps) and do the return row as normal, i.e. without increase or decrease. Fasten off and weave in ends.
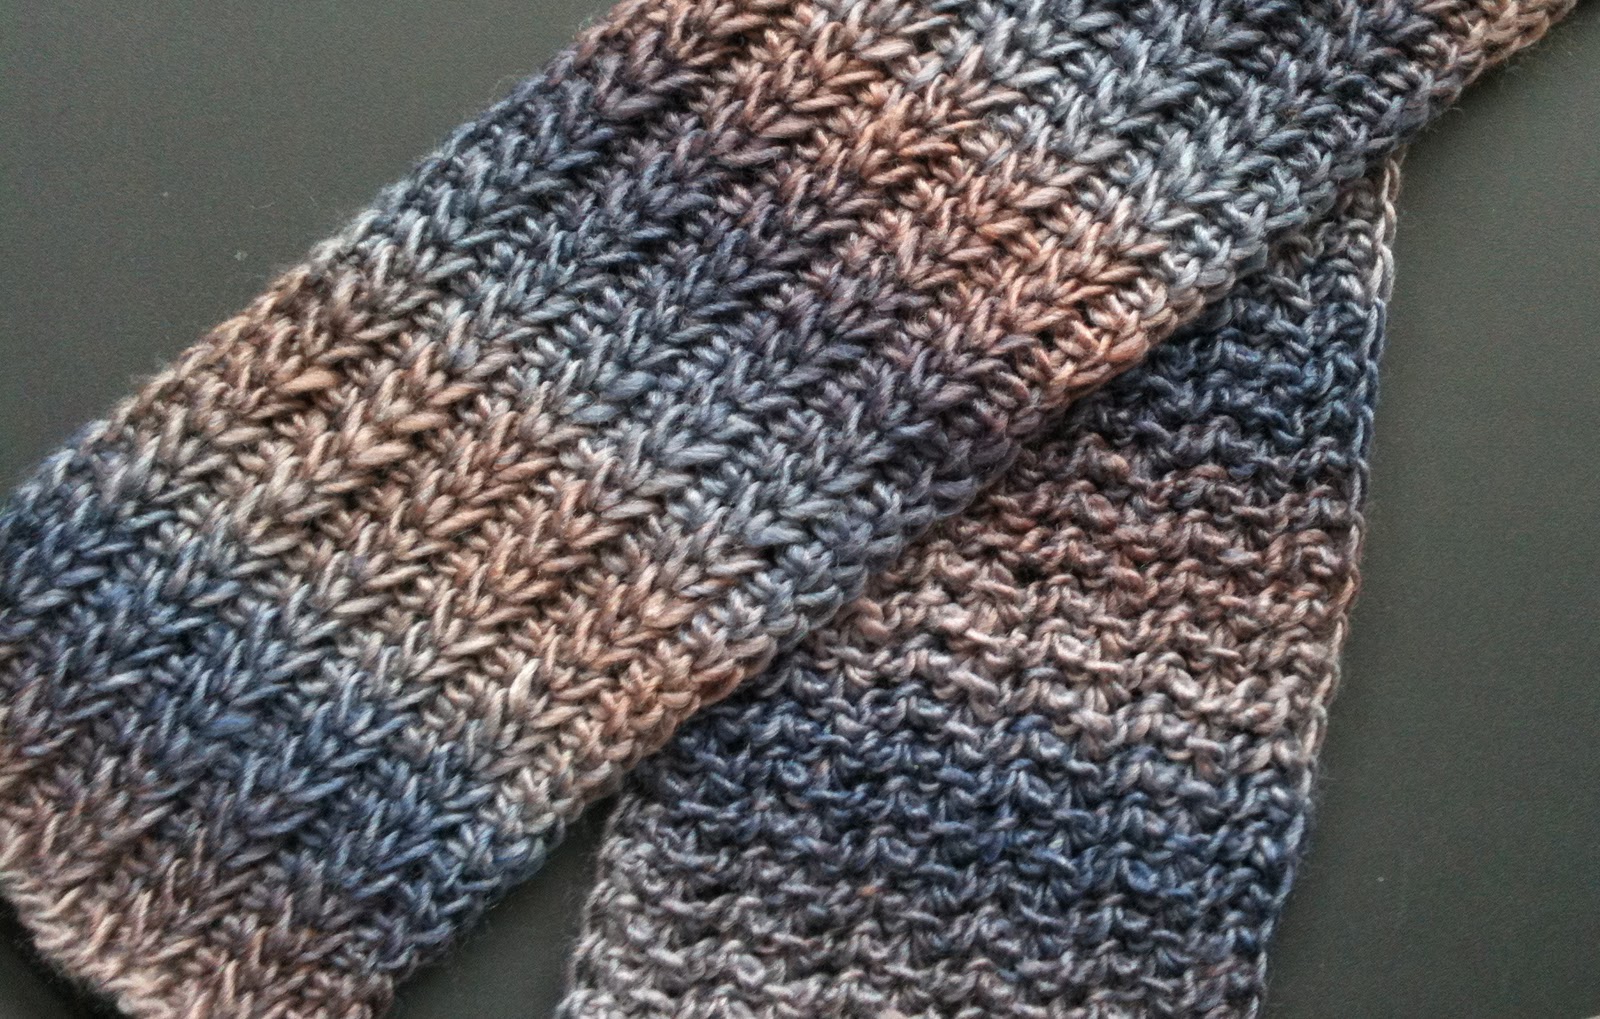
My finished scarf measures 178cm x 12.5cm or 70 in x 5 in. I found that my stitches tend to lean to the right, not quite sure how to counter this yet. I tried to loosen up a bit as I work across to the left, this helped somewhat. Also, overall you need to keep the tensions loose, or I prefer to say "keep the stitches relaxed". But do give the initial loop a little tug before you start a new row so that the right edge is not too loose.
Now I will include some photos I took along the way, hopefully they'll make sense to you. If not, I am happy to answer any questions and will do my best to clear things up for you :-)
 |
*Notice the gaps among the stitches,
that's caused by the yops (increases) |
*
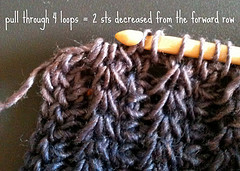
When you do p4tog, the 1st loop is from the yop (the increased st) and the other three loops are the (tfs, ttt, tfs) from the forward row. This will result in the 3 stitches become 1. That's why you need to do yop before and after the p4tog so that you still maintain the stitch count. Gosh it sounds so confusing, hope I haven't lost you completely!
*
After the set up row, you need to do the tfs through the gaps between the stitches.
* for ttt after the set up row
* If you hold the left edge towards you, you should see the edge looking like slipped stitches that have two bars/loops
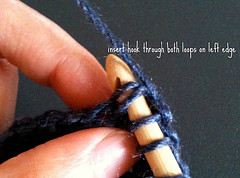 * To make a smoother edge on the left, you need to insert the hook through both loops/bars on the left edge for the last stitch on the forward row.
I hope these all make sense to you. The best way is to grab some yarn and a hook and start doing it, it is not a complicated pattern. Once you get pass the set up row, all you have to do is to repeat the same thing over and over again. If you're like me that your mind keeps wondering off in all directions other than the matter at hand, you might find missed stitches here and there, but the good thing is you can usually catch it on the return row so even if you have to frog it's never going to be too many stitches.
It is actually quite amazing how fast this worked up, and the fabric is not rigid at all. Frankly I am quite pleased with myself, and I think it turned out really nice. I hope you will enjoy it as much as I did. :-)
p.s. I'm sorry about the font sizes going up and down, I tried to fixed it but it didn't work.